Facilitating learning through webinars - Kunnskapsbasen
Facilitating learning through webinars
This guide shortly explains what a webinar is, describes various uses for webinars, goes over central points in planning a webinar, and offers practical guidelines for carrying out good webinars.
Norsk versjon - Webinar som digital læringsarena
To Teaching and learning support - for teachers
What is a webinar?
«Webinar» here describes web-based cooperation, instruction and training in real time via video conferencing tools. One of the advantages of webinars is that they can take place at any time and any place, and this way can make learning more accessible. Webinars also enable for practical solutions that are less available in physical meetings, such as swift partitioning into collaboration groups, file sharing and integration of external digital tools. There are several technical solutions available for carrying out webinars. Blackboard Collaborate Ultra is an expanded video conferencing solution accessible through NTNUs digital learning platform Blackboard.
-------------------------------------
Note: Students and staff at NTNU also have available Skype for business as part of the Office 365-package, however this is a digital meeting application which lack several of the tools that enhances the webinar-experience, hence Skype for Business is not a recommended tool for webinars.
How do you participate?
- Each session has a unique link that can easily be shared with internal and external participants.
- Presenters and participants should have access to:
- A stable Internet connection (preferably through ethernet cable, not wireless)
- Headset with microphone
- Web-camera
- Blackboard Collaborate Ultra works excellent in you browser, and Chrome is the browser that best supports Collaborate functionality. Read more about browser compatibility for Blackboard Collaborate Ultra here: Browser Support - Collaborate Ultra
- Some video conferencing tools need their own software installed beforehand (Skype, Zoom etc)
Examples of use
A webinar can be carried out in several ways, and with different purposes, as a replacement or supplement to campus-based learning activity. Below you will find some examples of webinar uses.
Instruction/training in real time
- Will often be a lecture adapted as webinar. The lecturer can present slides/video/digital wthiteboard, and add sessions with student activity via functions in video conferencting tools and other web-tools.
- Opens up for possibilities, but good use poses some new requirements for planning and execution. This wiki contains recommendations for preparing and running webinars that are highly relevant for instruction/training in real time.
- By doing lectures as pure webinars, you can give students equal opportunity to engage, regardless of where they are located. It will also be less challenging for the educator to deal with participants that all participate online, than having to balance between physical and online presence.
Guest lecturers and guest participants
- Most video conferencing tools have solutions for guest access, where guest lectureres can be invited with a link, and made presenter/moderator after joining a session.
- This allows for more flexible use of external lectureres to do short presentations as part of lectures/seminars.
- It is also possible to share links in social media to invite external participants to online sessions regarding internships, recruitment etc.
Digital interaction and group collaboration
- Group collaboration in real time can be scheduled for regular intervals, or be planned by the groups themselves and performed in open sessions.
- In these sessions, communications via chat and microphone can be combined with for instance collaborative writing tools and LMS group tools.
- Blackboard Collaborate Ultra is also available to students as a group tool, so that they themselves can create sessions. NTNU students also have access to Skype for business, and can create sessions here.
Reoccurring online meetings/Q&A sessions
- The educator can schedule regular sessions where he/she is available for questions. This way, the educator can cut down on time consuming one-to-one communications.
- This can advantageously be combined with using a discussion board. Students can then post questions on the board that are collected and later answered during well prepared Q&A sessions. This also opens up for students answering each other’s questions, making it an effective form of collaborative comminication.
- Web-based sessions can be a good solutions during exam prearations.
- Feel free to create calendar events for the recurring meeting, with a link to the session.
Guidance (virtual office hours)
- Student advisers can create open sessions at specific times.
- Can be carried out as individual or group counselling.
- The student adviser can share his/her screen from Word or similar, and this way do a detailed walkthrough of an assignment.
Ongoing communicaton using an app
- This can be especially practical when students are split into groups seated in different rooms.
- Also a possible solution for large lectures. The lecturer can for instance accept questions in Collaborate throughout the lecture and during pauses, and answer them at scheduled moments.
- With larger groups, it is advisable to include a teaching assistant or similar to aid in following up the chat, and help with technical technical issues along the way.
- The educator creates an open session for questions, answers and comments that runs parallel with a physical assembly. Students and staff can participate through a smartphone app. Blackboard - Instructor app for employees
Screen recording/screen casting
- Streaming of screen-activity (the complete desktop or individual programs) through a video conferencing tool, and the recording of this. Screen casting and recording is available in among others Blackboard Collaborate Ultra and Skype for business.
- Recordings can be shared with students before or after sessions,
- Can for instance be used in flipped classroom learning.
- A setup with two separate monitors is recommended.
- Recordings later published for internal and external use must be captioned, to comply with statutory requirements for universal access.
Recommendations for planning and organization
Having a good grip on form, content, your role and on technical solutions will, in addition to improving you webinars, help students become more secure in their active participation and thereby get more out of the webinar.
Content
Clarifying your expectations for the webinar, and what you require from participants, is important before you start the adaption/production of content.
- What is the purpose of the webinar?
- Instruction/training - descrive learing goals and outcomes
- Communication and/or collaboration
- What form will the session have?
- Lecture with slides
- Digital collaboration
- Guidance
- What activities best serve this purpose?
- Separation into smaller groups
- Polls
- Discussions
- External tools
- Are the prerequisites for participation met?
- Training resources
- Technical equipment and competence
- What is the time-frame of the session?
- The participants focus' will depend on subject content, the educators ability to engage and the possibility for active participation.
- As a rule of thumb, a webinar should not exceed 90 minutes.
- We know examples of 8-hour long webinars, for purely online subjects, where students reported being highly satisfied with long online sessions.
- You should rather plan multiple short sequences if active participation is not included. Variation will be a success factor.
Planning your structure
Adapt the presentation to your audience, time frame and purpose. Adapting lectures/courses to the webinar-form can take some time.
- Make a timetable for your presentation of subject matter, activities, Q&As etc.
- Be as precise as possible in your presentation.
- Prepare visual content so that it is as precise and informative as possible. Participants in online sessions may be more reluctant to ask questions as supposed to in physical contexts.
- Inform participants about the following at the start of a session:
- Whether or not the session is being recorded
- Where attendees can find resources (recordings, reading material, references, files etc) afterward.
- Whether time is set aside for questions at intervals, or are asked and answered as you.
- Examine whether it is possible and necessary to involve a moderator/technical support. It can be very practical to have someone answer questions in chat, help in smaller groups and that can take over should the presenter experience technical difficulties. This can be done by a teaching assistant or similar.
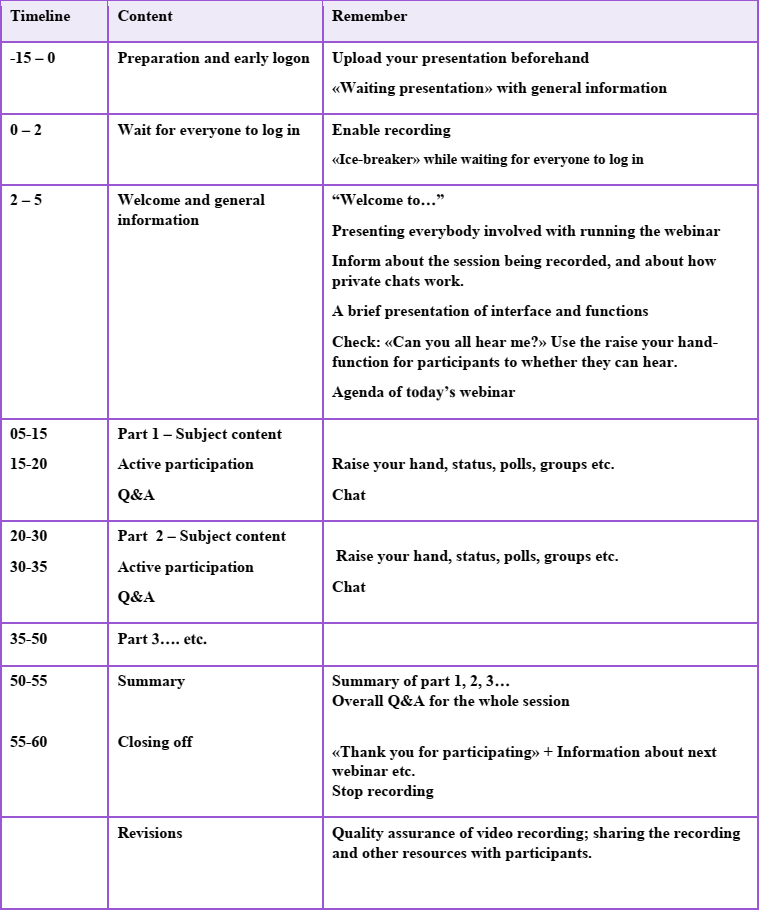
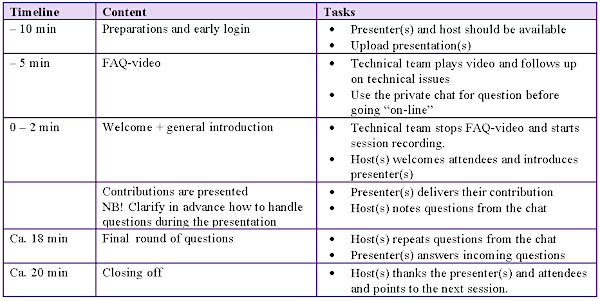
Suggested structure
Your strucure will depend on theme, purpose and other factors mentioned above. Suggestions for two differenct kinds of webinars are presented.
20 minute presentation

60 minute instruction/training webinar

Arranging for participation
- Create your session(s). How to Create a Session in Collaborate | Meetings in Skype for business
- Share the link (calendar event; email; announcement).
- Prepare students to attend. It is a good idea to send out a briefing by email/announcement where you inform about the practicalities of where and how to attend. In this, you can include links to relevant wikis and videos. Use the briefing to clarify whom participants can contact about what, for instance that Orakel should be contacted in case of technical issues.
- Example of webinar briefing
- Send out a reminder (announcement, e-mail)
- Do a test-session with a colleague.
- Captioning for universal access: It is possible to do ongoing caption during the webinar, but this can be demanding. We recommend captioning later. Recorded sessions must be captioned before being published by your learning institution.
Technically
- Test your camera and microphone in advance.
- Contact Orakel support services if technical problems occur.
- Use a mutable headset.
- Set your mobile and other devices to do not disturb; put up a notice on the door of your office.
- Clean up the physical space behind you (clutter behind you when presenting can be distracting).
- Close unnecessary programs and tabs, to be sure that your video conferencing tool can run without problems (running as presenter demands some additional resources).
- Practice in advance, especially if you plan to use new functions.
- Remember to upload files for presenting in advance. Supported file types for Blackboard Collaborate Ultra are ppt; pptx; pdf; images in png, jpeg jpg –format.
- Do you have the opportunity and demand for someone giving technical support during your session? Technical support can help with problems connecting, sound/video problems etc. Consider supplying email/phone number of technical support in you webinar briefing.
Recommendations for running a webinar
Good academic content should be combined with performance that engages and clarifies. The webinar form sets some requirements for presentation that are not as pressing in physical meeting, or fall less natural to use in the absence of face-to-face communication.
Practical implementation
- Have and outline of your presentation available, with notes to yourself about running the webinar, on a second screen or on paper. Add reminders abut practical points such as devices to engage participants, and notes about specific functions and tools.
- Have some planned transitions ("We have looked at..., and are now moving on to the next slide where...”, starting phrases ("Welcome to this webinar in...") and closing phrases ("Thank you for your participation in...") ready.
- Open the session at least 15 minutes before start. No one can log into a session before it is open; it can be a good idea to have the room open 30 minutes early, but inform participants that they can log in 15 minutes
- Remember to turn on recording before starting your session.
- Feel free to use a waiting presentation where you welcome participants, inform about when you start and give solutions to common technical problems. An ongoing, repeating, presentation may be used for this while waiting for everyone to log in.
- Give participants a couple minutes extra to log in before starting.
- Endorse participants and make sure that everyone can hear you (for example by using the raise your hand-function)
- A short startup presentation with a simple FAQ can be used to introduce layout and functions
- Be clear about the role of presenters and moderators, and what support they can provide.
- Set aside enough time for questions and answers along the way.
- Online participation will for many be more taxing on their concentration. It can be a good idea to take brief pauses (1-2 minutes) between sections of the webinar, for instance after every round of questions and answers.
Presentation
- To compensate for the effects of attendees participating from home in front of their computer, with possible distractions and without the extra activation the presence of others provide, webinars need a more focused and energetic presentation than classroom education.
- Remember to set aside enough time to ask - and answer questions.
- It is common to talk about "3 magic seconds" in regular teaching, to give participants enough time to answer before answering the question yourself. People need more time in online sessions, partly because it takes some time to write questions in chat. Use longer breaks between sentences than what feels natural.
- Speak clearly and take your time. You probably talk faster than you think rather than the opposite.
- Keep your focus through the presentation. Digressions become more conspicuous in webinars than the classroom, and it is more difficult for participants to distinguish relevant from non-relevant content without you physically present.
- Use the pointer and drawing to direct peoples attention.
Presence and connection in online sessions
Students' endorsement of web-based education has been demonstrated as connected to their experience of social presence from educators, and whether they receive positive and specific feedback [1]. Below is a collection of tips on how to enhance participants experience of social presence and closeness in online sessions.
- Who are you? Use a separate slide with pictures and descriptions of presenter(s) and moderator(s). Everybody introduces themselves through microphone.
- Feel free to use a "profile picture".
- Dare to be a bit personal.
- Use an "ice breaker" while waiting for everyone to log on to a session.
- Use fitting humor if you are comfortable doing so.
- Visualize your audience - speak to them as if they where in the room.
- Use participants’ names.
- Give participants attention and give positive comments. In sessions with a few participants you can start doing this while people are logging in (I see that ..... has logged in, welcome to todays session."
- Be conscious of where your rest your gaze: Not just fixed on the presentation surface, and by all means not only on a printout of your manuscript.
Engaging participants
Following an on-screen presentation without the physical presence of others can make it challenging for many to uphold their concentration and motivation over time. In lieu of physical gests, your voice can be used to "color" your presentation.
- Speak with energy!
- Vary tone and prosody: Intonation, volume, tempo, and stress.
- Use devices such as humor, pauses and direct appeal to participants.
- Practice beforehand. Speaking to someone not physically present can feel unnatural at first.
- Stand up and smile while presenting. This will often have the effect of making both you and your voice more comfortable.
- Avoid passive participation!
- The webinar format makes it both more practical and necessary to apply active learning methods. Concrete advice for enabling active participation is found under the next section Enabling active participation.
- A good rule of thumb is not to let more than 6 minutes pass without any form of interaction.
- Set aside time for questions, exchange of experience and discussions in plenary and groups.
- Consider beforehand how much subject content is neccesary to present as a one-way lecture.
Enabling active participation
Webinars offer plenty of opportunities to apply varied and active methods of learning. Presented below are some solutions using Blackboard Collaborate Ultra alone, or in combination with external tools. Other video conferencing solutions offer similar functions as Collaborate.
- You (as moderator) can change the status of participants during a session to presenter. This way, students can present files (ppt; ppt; pdf; images), screencast and use the digital board. When Collaborate is used as a group tool, all participants have this access from the start.
- Breakout groups have their own sound, video, presentation surface and file sharing independent of the plenary session. Participants can be distributed to breakout groups by random assignment, manually, or may self-enroll (by checking the alternative "Allow attendees to switch groups").
- Collaborate, and similar tools, offer multiple functions to enable interaction and give feedback.
- The hand raising function emulates raising your hand in a physical meeting, and can be used by participants to signal that they have a question/comment, or for instance for doing quick polls like "who here also attends the course ..... ?"
- The feedback/status function in Collaborate enables participants to promptly express their experience of a session by setting their status to "faster", "slower", "agree", "disagree" etc.
- Moderators, presenters and participants can all use the chat function either in plenary or breakout groups. You can also allow for one-to-one messaging.
- The polling function can be used to do quick polls with up to five alternatives. You choose whether the distribution of answers are visible to participants or not. Displaying poll answers can be used to stimulate further discussion ("Why do you think that some many have the impression that... ?"
- Blackboard - Functionality in Blackboard Collaborate Ultra
- Collaboration in external tools such as Padlet, Socrative, OneNote and Word can easily be integrated with video conferencing solutions, by sharing participation links by chat.
- Socrative or Quizlet can be used to administer a test before or during a webinar. The educator can then use extra time on content a test report indicates that people need additionaly explained.
- Padlet is a "digital corkboard" that can be used parallel to Collaborate session for the collection and presentation of text, photo, video and more. Other alternatives available are digital whiteboards such as Whiteboardfox.
- A shared OneNote (available to all NTNU students and staff through the Offce 365-package) "notebook" can be used by groups attending a webinar to efficiently organize information into one place.
- Word (available to all NTNU students and staff through the Office 365-package) can be used as a collaborative writing tool during group session i Collaborate. The results from collaborate writing can be presented to the other groups in Collaborate as a pdf-document exported from word, or by screen casting
Closing off and revising
- Point out the next step for participants; inform about next session. Repeat that files and a recording will be shared.
- You can also keep the session open for questions for a while after finishing the planned webinar.
- Evaluate the webinar. What worked, what didn’t, what can be done differently next time?
- Revising the recording; texting the recording.
- Sharing the recording, files and sources with participants.
See also
Blackboard - Video conferencing with Collaborate Ultra
User support - Skype for Business (previously Lync)
Contact
Contact teachng support through Orakel user support if you have questions about planning or running a webinar.
References
[1] Grieve, R., Padgett, C. R., & Moffitt, R. L. (2016). Assignments 2.0: The role of social presence and computer attitudes in student preferences for online versus offline marking. The Internet and Higher Education, 28, 8-16.