Connect to your home directory via Linux - Kunnskapsbasen
Connect to your home directory via Linux
You can connect to the NTNU network directories for your home-, group and web.
Norsk versjon - Koble til nettverksområde med Linux
Ser du etter noe annet?Temaside om IT-hjelp | Sider merket med nettverksområde
Off-campus? Connect with VPN
For security reasons you will have to connect to the NTNU network with VPN before you can connect to the network directories.
The exception is the use of the sshfs and sftp methods (see below), which do not presuppose a VPN-connection.
It might seem that connection by way of the graphical tools of Gnome or Ubuntu is the most easy method.
But in the long run it will be more practical to set up automatic connection at PC startup.
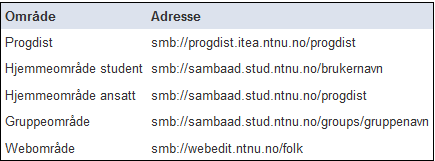
List of NTNU network directories
Refer to this list when you work with the instructions below.
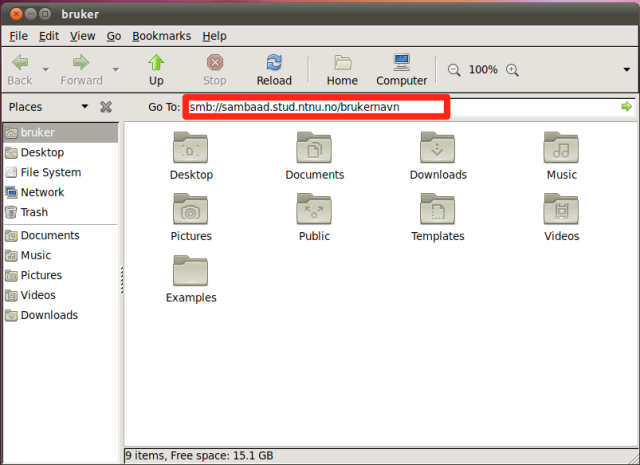
Private file area for students:
smb://sambaad.stud.ntnu.no/username
Private file area for employees:
smb://home.ansatt.ntnu.no/username
For student organizations and groups:
smb://webedit.ntnu.no/groups/group name
For groups' web sites:
All NTNU users will have read access to these files.
smb://webebit.ntnu.no/groupswww/group name
For the central administration:
Limited access for employees in the central administration at NTNU.
smb://felles.ansatt.ntnu.no/adm
For IVT:
Limited access for employees at the IVT faculty.
smb://felles.ansatt.ntnu.no/ivt
For NT:
smb://felles.ansatt.ntnu.no/nt
For your personal web site (for students and employees):
All NTNU users have read access to these files. This web site is available at http://folk.ntnu.no/username
smb://webedit.ntnu.no/brukernavn
For the NTNU web sites:
Limited access for most NTNU employees
smb://webedit.ntnu.no/www
Shared area for employees: (available from 01/01/2017)
smb://felles.ansatt.ntnu.no/ntnu
Connect using graphical tools
For alternatives 1 and 2 to work, you must already be logged on to the NTNU network, either by using a computer with a cabled connection to the NTNU network, or by the the wireless network or, if off campus, by using VPN.
Alternative 1: Use the file manager of either Gnome or Ubuntu desktops
There are only minimal visual differences between the Gnome and Ubuntu desktops. The examples shown are from the Ubuntu desktop.
Step 1:
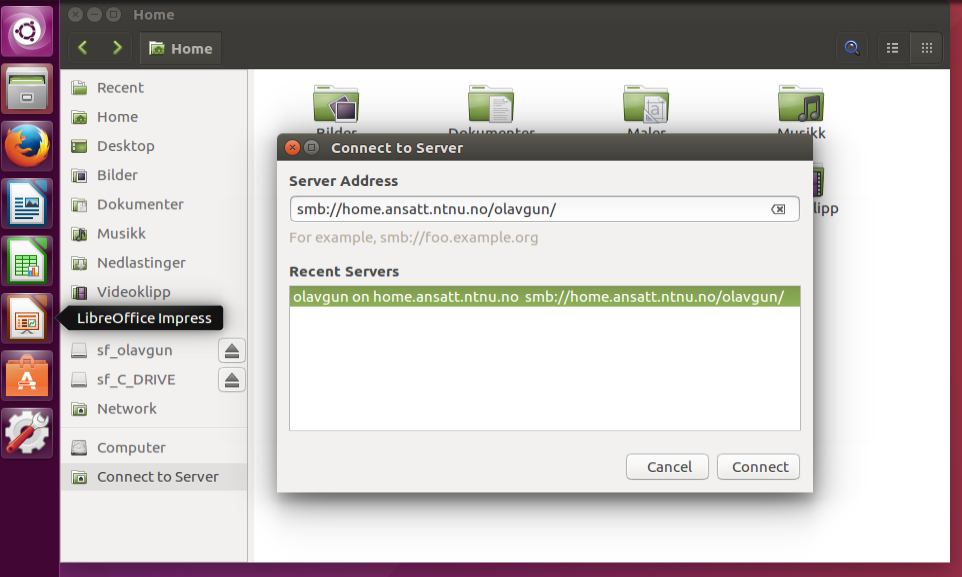
Open the file manager, and open the file manager's sidebar. At the bottom of the sidebar you will hopefully find a menu item Connect to Server. Press this menu item. An address dialog will then be opened. Type in the address of the network device you want to connect to (See list above).
For the home area for employees, the address is smb://home.ansatt.ntnu.no/<your_username>

Press Connect.
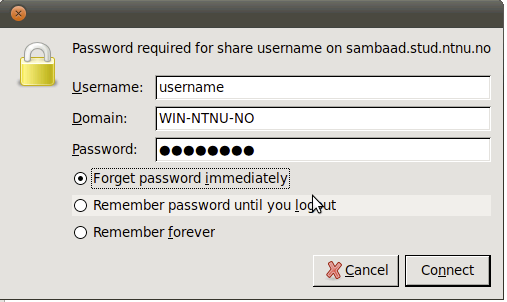
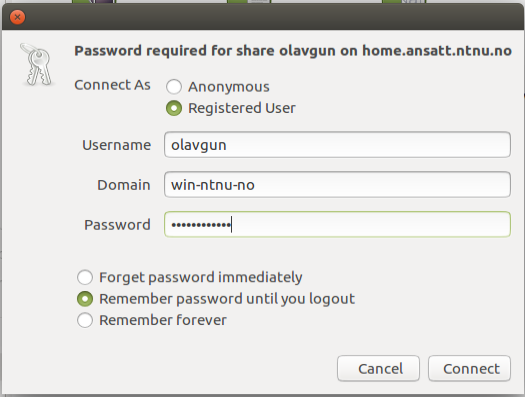
Step 2:
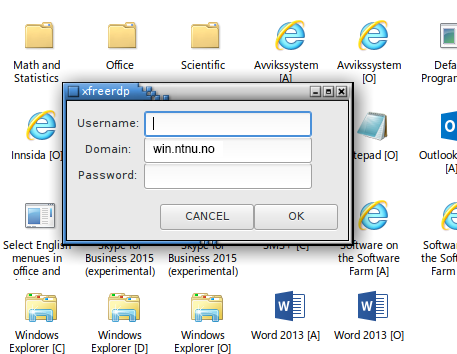
A password dialog will be opened.
.png)
Tick Registered User.
Username: Your username at NTNU
Domain: win.ntnu.no
Password: Your NTNU password.
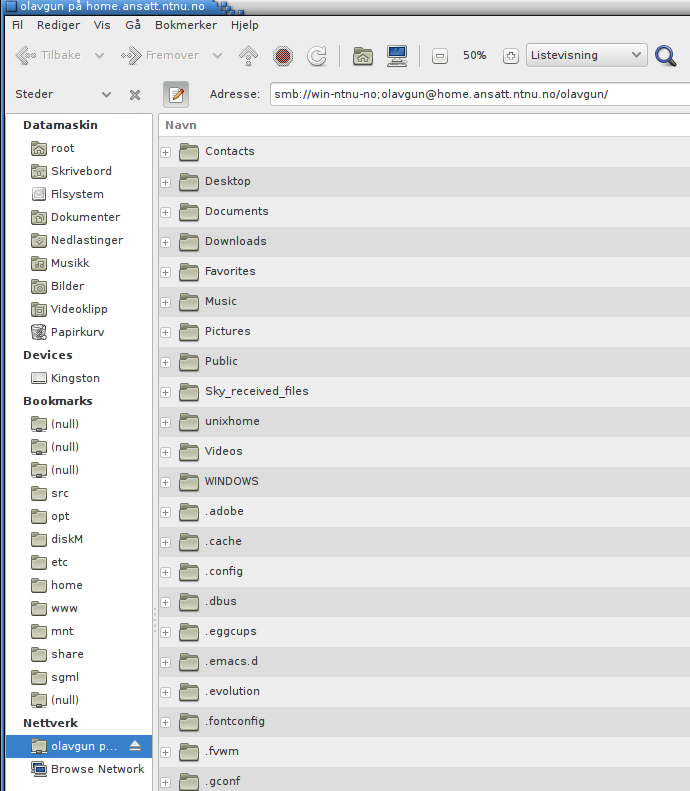
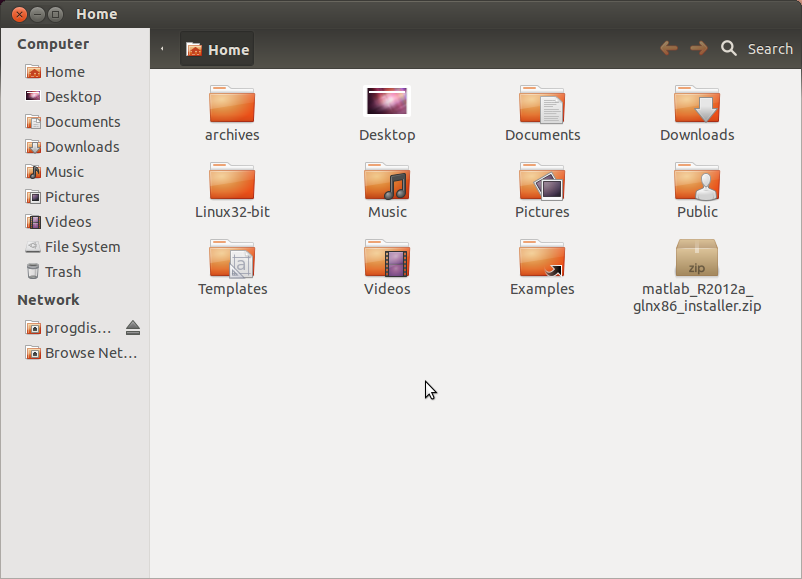
Press Connect, and the your folders and files on the network disk area will be shown in the main area of the file manager:

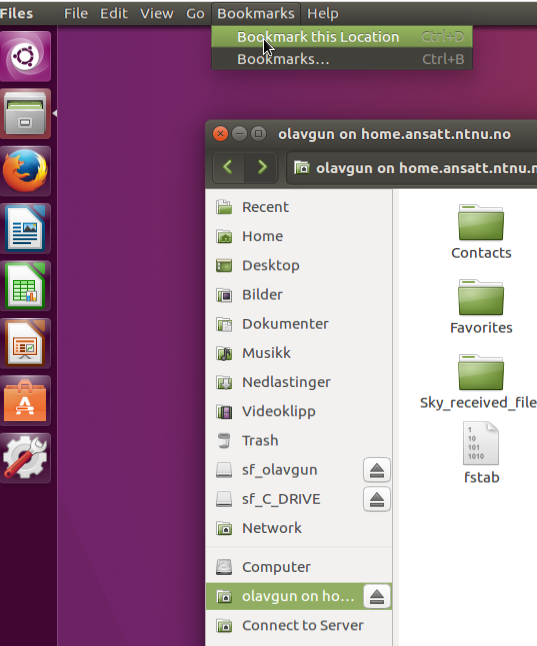
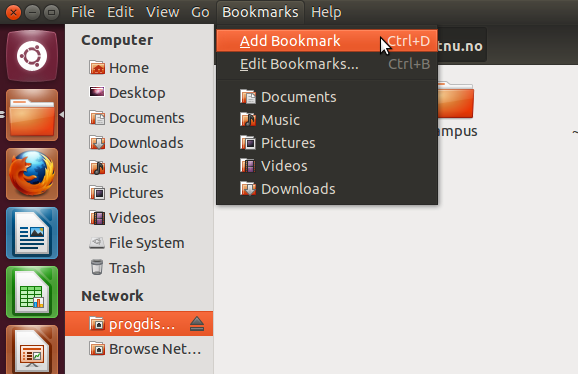
Step 3: Add bookmark
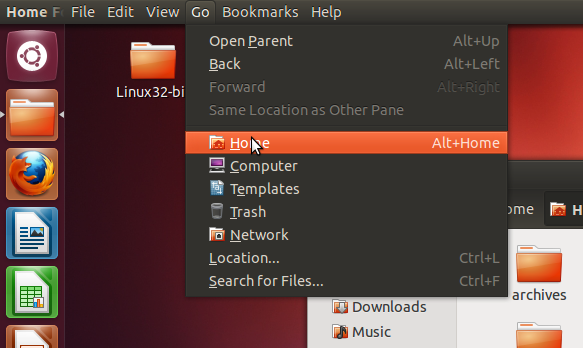
By pointing at the menu bar at the top of the screen, the file manager's Bookmarksmenu will be shown. Press Bookmark this location, and the network disk will get a bookmark in the file manager's sidebar.
The bookmark is persistent across your sessions. So that the next time you log in on you computer, you can just press the bookmark to mount the network disk area.
If you have not ticked "Remember forever" in the passwor dialog above, you will now be given a password dialog to log in.

As there are some differences between the several linux distributions, here is another variant of how to bookmark your network resource:

Alternative 2: Mate Desktop
Today's design of the Ubuntu and Gnome desktops was done with a myopic tunnel view on the coarse touch screens of tablet computers, mobile phones and similar non-work appropriate devices. These designes were experienced as inexpedient by people working on traditional comuters with a real keyboard and a mouse. Therefore alternative designs were made, based on true conservative values, sense and reason. One of these alternatives is the Mate Desktop.
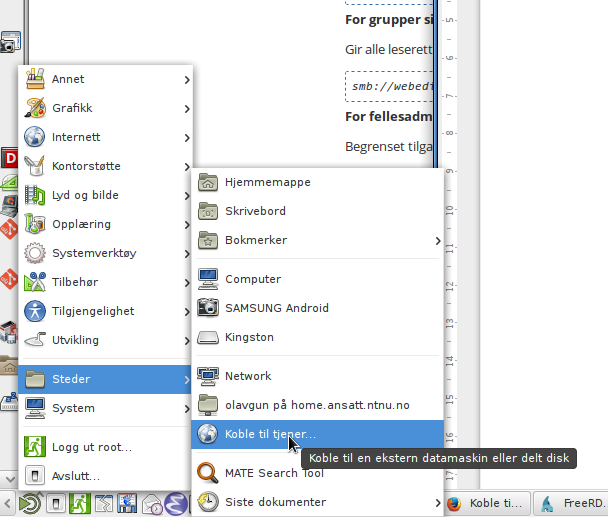
By pressing the Mate main menu where it always has been and always shall stay put, i.e., at the bottom left corner of the screen, you will be able to choose Places -> Connect to Server (no: "Steder -> Koble til tjener").

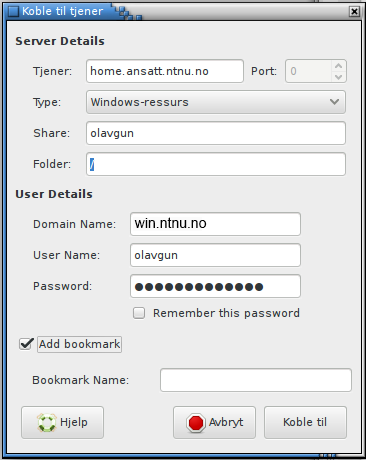
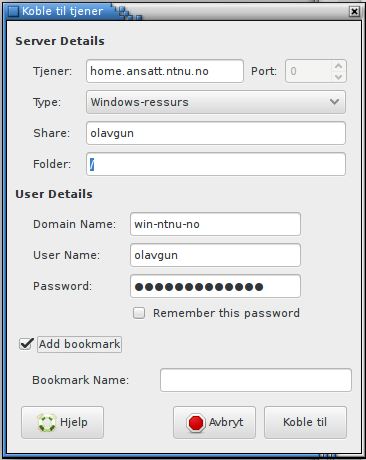
Press Connect to server (no:"Koble til tjener"), and this dialog will open:
.png)
"Type": choose Windows resource. This means that we have to omit the prefix "smb://" in the address field. "Server": type the address of the service, without the prefix, and up until but not including, the first slash ("/") of the address (Cf. list at the start of this document).
"Share": The rest of the address given in the list above, e.g. in the list we find smb://home.ansatt.ntnu.no/<your_username> for your personal home area. Type <your_username> at NTNU here. For groups we find: smb://webedit.ntnu.no/groupswww/<groupname>. Type groupswww/groupname in this field.
"Folder": type a slash ("/") for the root of your network disk. Or use /<Foldername> to connect directly to a folder within your network disk, e.g. /Documents/docs2017 .
Tick Add bookmark and fill in the Bookmark Name field, to add a bookmark to the file manager's sidebar.
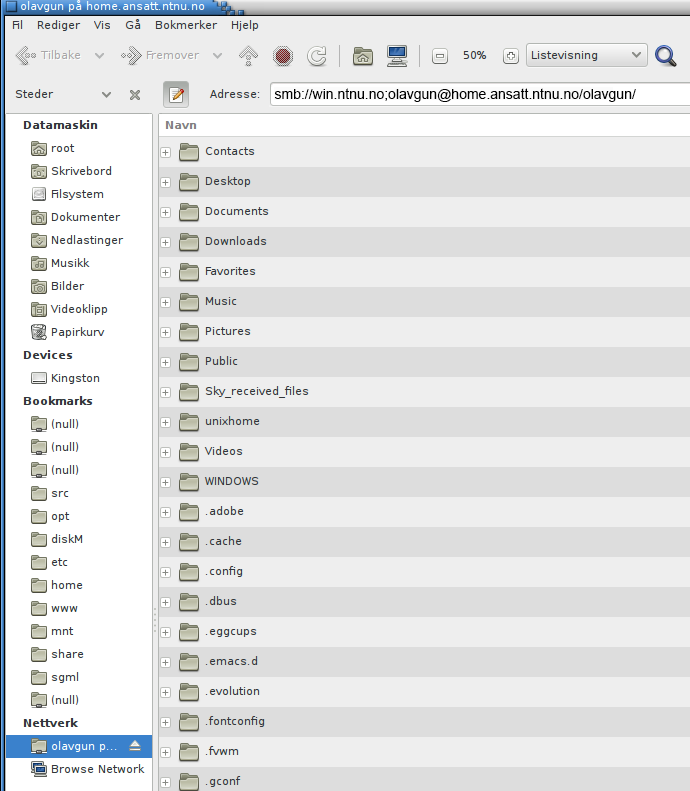
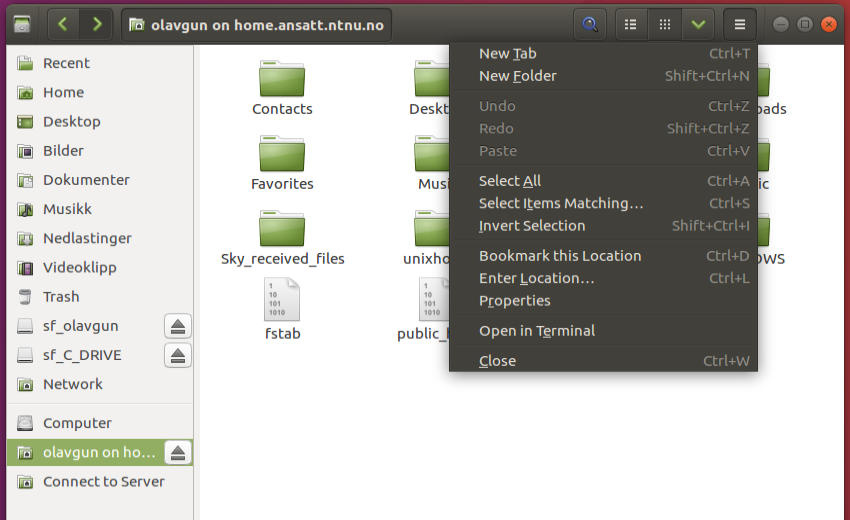
Press Connect, and the file manager will open your network resource in its main panel:
.png)
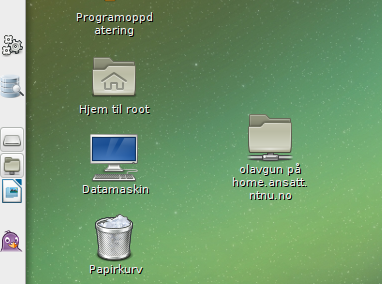
As with Gnome and Ubuntu, above, a shortcut is placed on your desktop:

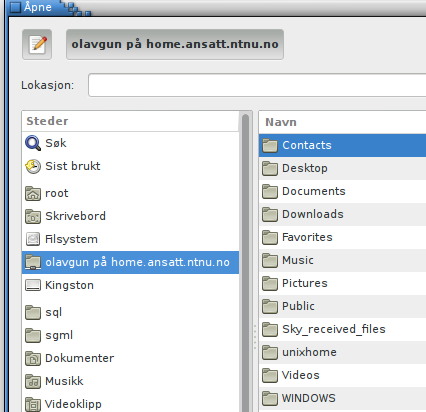
And as with Gnome and Ubuntu, above, the network disk area is accessible from within the programs you run, here shown for LibreOffice:

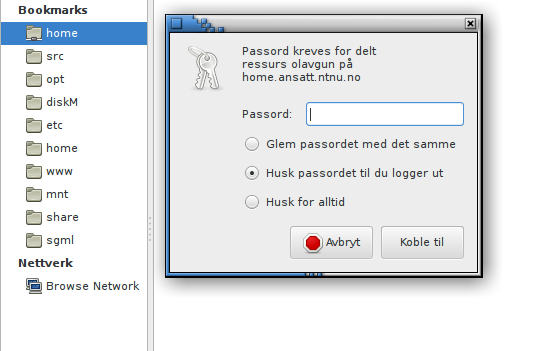
If you did choose "Add bookmark" in the "Connect to Server"-dialog, the network disk area's bookmark will be shown in the sidebar of the file manager. The bookmark is persistent across sessions, so the next time you log on to your computer: press the bookmark, and a password dialog will be shown before you can access the network resource:

Alternative 3: SFTP from the file manager (Gnome and Ubuntu desktops)
Sftp means Secure File Transfer Protocol. The "Secure" part means that security is taken care of in a way that does not compel you to log on to NTNU by VPN first, should you be off campus.
Connect to your network disk home area
For your network disk home area (Private file area for students/employees in the list at the top of this document), the system is not capable of finding the correct network address automatically. To find it, you will have to log on to the server in command line mode:

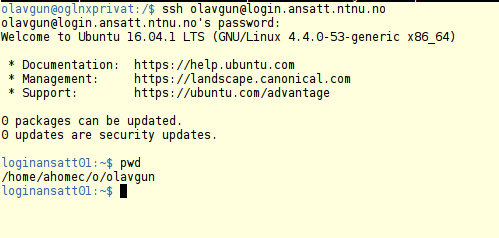
Explanation of the screenshot:
Open gnome-terminal or any other command line program. Type on the command line:
ssh <your_NTNU_username>@login.stud.ntnu.no

ssh <your_NTNU_username>@login.ansatt.ntnu.no
- for students and employees respectively.
When logged in, type at the command line: "pwd". Your will then be given your excact file path to your home network disk area. In my case that is /home/ahomec/o/olavgun. Take a note of this, and log off by typing exit.
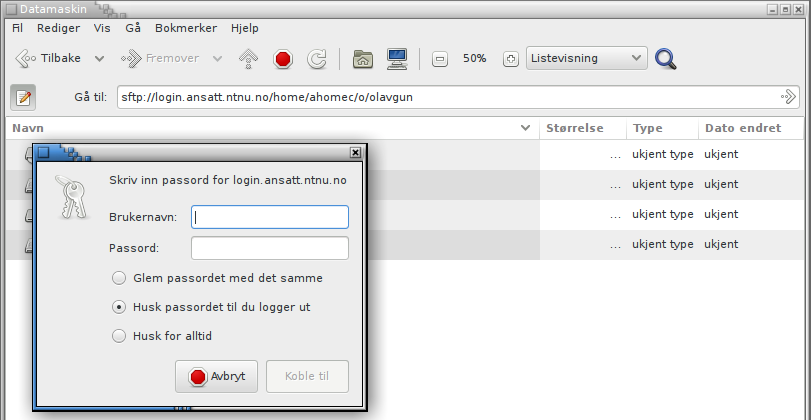
Now, on you own computer, open the file manager and type in the address field:
sftp://login.ansatt.ntnu.no/<your file path>

sftp://login.stud.ntnu.no/<your file path>
- for employees and students respectively.

All other disk areas
For all other disk areas you can use the addresses given at the top of this document. But you have to change the protocol prefix from smb:to sftp://
It should be possible to bookmark the sftp-connections in the same way as with the smb-connections (see above).
Text-based tools for manual or automatic connections
As the text-based manual connections must be done from scratch each and every time you want to connect, the setup for automatic text-based connections below are recommended.
Manual connection with sshfs
Sshfs means "Secure Shell File System". The "Secure" part means that you do not have to connect to the NTNU network with VPN first, as sshfs itself takes care of that kind of security.
Install the sshfs-tools
Use your favorite package updater (like "Synaptic" or "Software and updates", to install support for sshfs, or run the following command from the command line:
sudo apt-get install sshfs
Using sshfs
First, we need a folder to map your network share to. For instance, you may want to have your personal share on /home/username/stud, group share on /home/username/groupname and the web share on /home/username/website.
Create these folders by running:
mkdir ~/diskM
mkdir ~/website
mkdir ~/groupname
Then, map the shares, using the following three commands, one for each share. Note that the username is your NTNU username.
sshfs username@login.stud.ntnu.no: ~/diskM
sshfs username@login.stud.ntnu.no:/web/folk/username ~/website
sshfs username@login.stud.ntnu.no:/home/groups/groupname ~/groupname
Employees must of course change "login.stud.ntnu.no" to "login.ansatt.ntnu.no".
Manual connection with mount.cifs
This method presupposes that you are either situated on campus (cabled or eduroam), or that you are connected to the NTNU network with VPN, should you be off campus.
This method uses the "Common Internet File System": CIFS.
Install cifs-utils
The necessary tools can be found in the software package cifs-utils. They can be installed from your favourite package manager or from the command line by:
sudo apt install cifs-utils
cifs-utils depends on several other packages which will be installed in the same process.
Using "mount"
You will have to set up folders on your personal computer as mount points for the remote file systems.
Let us presuppose that you want the home areato be mounted on /home/<localuser>/diskM, your web area on /home/<localuser>/folk, your group area on /home/<localuser>/mygroup.
Set up these folders from the command line, thus:
mkdir ~/diskM
mkdir ~/folk
mkdir ~/mygroup
When this is done, you can run the mount command. In the examples <localuser> is your home folder on your personal computer. <ntnu_user> must be filled in with your NTNU username.
- For your home area:
sudo mount //home.ansatt.ntnu.no/<ntnu_user> /home/<localuser>/diskM -t cifs -o username=<ntnu_user>,workgroup=win.ntnu.no
sudo mount //sambaad.stud.ntnu.no/<ntnu_user> /home/<localuser>/diskM -t cifs -o username=<ntnu_user>,workgroup=win.ntnu.no
- For your www area:
sudo mount //webedit.ntnu.no/<ntnu_user> /home/<localuser>/folk -t cifs -o username=<ntnu_user>,workgroup=win.ntnu.no
- For a group area://
sudo mount //webedit.ntnu.no/groups/<group_name> /home/<localuser>/mygroup -t cifs -o username=<ntnu_user>,workgroup=win.ntnu.no****
- To disconnect, i.e. un-mount:
sudo umount /home/<localuser>/stud
Permanent mount points and fstab entries
It is possible to save connections by mount and by sshfson your computer, so that do not have to type the complicated command each time you want access to your network resource.
If you are connected to the NTNU network by cable, mounting the network resource by mount, will happen automatically when you boot your computer.
If you are off campus when booting your computer, you can easly connect to the network resource by a simple command once you have logged on to VPN. The same is the case if you are on eduroam.
I have not managed to make automatic connection by sshfs, but once your computer is booted, the same simplified command will activate a saved sshfs connection.
Permanent mount points and auto-mounting with mount.cifs
First install the software package cifs-utils, e.g. by typing at the command line:
sudo apt install cifs-utils
Save your NTNU username and password
Then create a file containing the username, password and workgroup for your user. My preferred location for this file is in /root/ The file is then most secure from misuse by other users of your computer.
Use your favorite editor (like emacs, vim or nano), or use the very simple editor gedit, to set up the password file. Note that the editor has to be launched from the command line with sudo for it to be able to save the file in the root folder.
sudo gedit /root/.ntnupasswd
The information in this file should be as follows (exchange <username> with your NTNU username and <password> with your NTNU password):
username=<username>
password=<password>
workgroup=win.ntnu.no
For security, only the root user should have access to read this file. Give it exclusive access by running these commands:
sudo chown root.root /root/.ntnupasswd
sudo chmod 600 /root/.ntnupasswd
Set up mount points (create folders)
As with the manual use of mount.cifs (above), there must exist folders owned and accessible by your local username. These are used as mount points for the external resources. In the example above, we established these folders inside your home directory. You can use those folders in the present case too. But it is also possible to folders elsewhere on your local disk. In this example we will make the folders under mnt. Set up the folders thus://
mkdir /mnt/diskM
mkdir /mnt/mywebsite
mkdir /mnt/mygroup
Edit the file /etc/fstab
Now, user your favorite editor (hopefully emacs, or -- god forbid!-- vim, or the very simple editor gedit) to add entries to /etc/fstab. As this file is owned by root, you will have to start your editor from the command line with sudo. The examples below will work for both private and shared network shares and your website. Edit /etc/fstab by running:
sudo gedit /etc/fstab
Append the follwing lines to the file:
#address:                      mountpoint:   filsystem: options:
//sambaad.stud.ntnu.no/<username> /mnt/diskM    cifs    defaults,credentials=/root/.ntnupasswd,uid=1000,gid=1000 0 0
//webedit.ntnu.no/<username>      /mnt/website  cifs    defaults,credentials=/root/.ntnupasswd,uid=1000,gid=1000 0 0
//webedit.ntnu.no/groups          /mnt/groups   cifs    defaults,credentials=/root/.ntnupasswd,uid=1000,gid=1000 0 0
Note that you need to exchange <username> in line 1 with your NTNU username.
Uid and gid need to be correct for your local user on your personal computer. For the first user on an Ubuntu install, the example is valid, but if your setup is different, you can find your uid and gid by running the command id.
The network shares will now be automatically mounted when you boot your computer.
Manually mouting all the network shares
sudo mount -a
Manually mounting only one share is done by mount <mountpoint>, like this:
sudo mount /mnt/diskM
How to disconnect
To disconnect from a mounted network share, type:
sudo umount <mountpoint>
e.g.
sudo umount /mnt/diskM
Other possible fstab settings
The "noauto" option
If you do not want your computer to try mounting the shares at boot time, you can add "noauto" under options in the lines in /etc/fstab. You will then also have to remove "defaults" as this is incompatible with "noauto". You will also have to add "rw" to get read and write access to the network disk ("defaults" already comprises "rw") For your private share, this will then be:
//sambaad.stud.ntnu.no/<username> /mnt/diskM cifs noauto,rw,credentials=/root/.ntnupasswd,uid=1000,gid=1000 0 0
The "user" option
If you want to be spared from the need to open your manual mount and umount commands with the cumbersome sudo, you can prepend the "options" part of the fstab-entry with "user,". Then the password file must be placed somewhere where your own username has access to it, e.g. /home/<mylocaluser>/.ntnupasswd.
Set your own local username as the owner of the file:
chown <mylocaluser>:<mylocaluser> /home/<mylocaluser>/.ntnupasswd
Set the permission to only readable by <mylocaluser>:
chmod 600 /home/<mylocaluser>/.ntnupasswd
sshfs and fstab: permanent mount points
Establish the local folders to be used as mount points in the same way as with mount.cifs, above.
Install the software packages fuse and sshfs, either from your favorite package installer, or from the command line as described above.
Then edit the file /etc/fstab (see above), by adding the following line, when the desired disk area is your home area:
sshfs#<yourNTNUusername>@login.ansatt.ntnu.no: /mnt/diskM fuse user,defaults,idmap=user 0 0
The network share can now be mounted by the command line mount /mnt/diskM, and disconnected my umount /mnt/diskM.
The network share will not be automatically mounted at boot time. (The main reason for this, is that the fstab-entry does not contain any mechanisms for user authentication, like we did with the .ntnupasswd-file.An other reason is that even if we did, the fstab-file is processed at an awkward time for the ssh-authentication mechanisms to work smoothly. We consider the question of automatic connection at boot time to be too complex to be treated of here.)
Contact
Orakel Support Services can help if you have questions or if you encounter difficulties.