Archiving laboratory data - Kunnskapsbasen
Archiving laboratory data
For employees and students at the NV-Faculty that needs to move and archive data generated in the various scientific laboratories.
Innholdsfortegnelse [-]
Introduction
We have a system at the NV-Faculty that are designed to specifically take care of archiving from computers in labs that are attached to instruments that generate data. This system is available for use by students and employees and even external users of the various labs that employ it...
The system is available here:
https://app.nt.ntnu.no/archive/
Key features
- The ability to download data from lab computers in the background.
- The ability to download data from lab computers through web upload.
- Offering a web interface for starting archiving and managing data sets from lab computers.
- Offering access to data over web.
- Offering access to data via downloadable zip- or tar- files.
- Offering access to data via samba/CIFS shares.
- Multiple platform availability: Windows, Mac OS, Linux, Unix etc.
- Better security by encouraging users to stop using external HDs or USB drives on the lab PCs that potentially brings viruses with them.
- Use and access independent of being associated with NTNU or an external user of the labs.
- High degree of data access- and sharing abilities, which makes it easy to share data created by one user to others.
- Automatic notification of upcoming deletion and deletion of expired data sets.
- Barebone web interface to ensure compatibility over platforms and old versions of browsers.
- Does not require any plugins or special software on the lab PC for using the web system, except a SSH-server with some Linux shell tools (a custom package are provided for this in Windows).
- Free to use.

Getting to use it
Everyone having lab computers at the faculty can start to use the archive system provided they meet the necessary criteria (network access, OS, etc.). All kinds of users are allowed, even external to NTNU. Below are guides for users and computers.
By a user
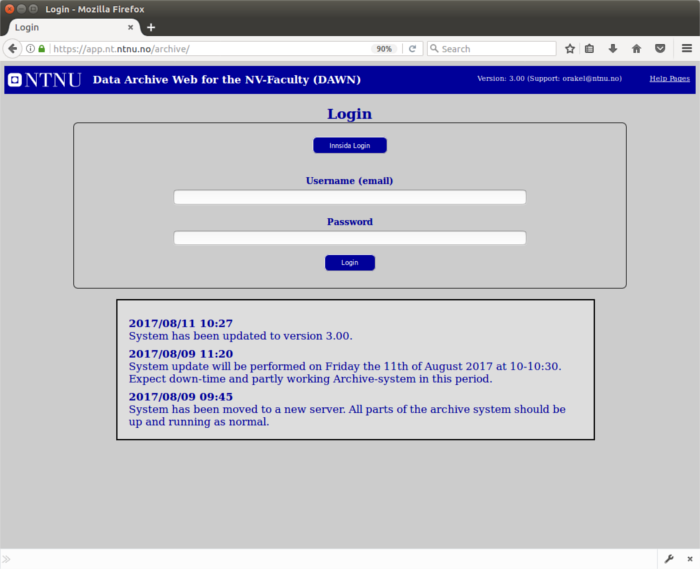
For NTNU-users the ability to login and start using the system can be achieved by the user himself. This is done by going to the archive systems web address:
https://app.nt.ntnu.no/archive/
and selecting "FEIDE Login". Log on with your username and password at NTNU. The archive system will then create a user entry automatically based on this login.
For users outside and external to NTNU, they need to have either the IT-services or a responsible user for lab computers in the system to add them. For us to add them, please send an email to: orakel@ntnu.no and include their first name, last name and email address and state that it concerns adding a user to the NV-Faculty DAWN archive-system.
There are also some labs that are completely shut off from reaching even NTNU internet resources. These computers are not able to login using Innsida authentication. Then the user needs to use his email-address registered with the system and a password. The password can be set and changed by the user himself before going to the lab in the event that he uses Innsida authentication. For other users - a password will be generated upon the creation of your account and emailed to you.
By a lab computer
In order for a computer in a lab to be able to start storing data, it has to be registered by the IT-services in the system. In addition we would need some information:
- What monthly or yearly storage need do you foresee that the lab computer needs (this is subject to our approval)?
- What lifespan should the data archived on the computer have before it is deleted from the archive system (in weeks, months or years)?
- Who are going to be the people responsible for the lab computer (please provide names and email addresses)?
- Which department and room number does the computer belong to?
- What operating system is this computer running (Windows, Mac OS, Linux etc.)?
- What descriptive name should the computer have (usually follows the instrument it controls - eg. "QCM", "NMR400" etc)?
- The K-/NT-/NTNU-number of the computer (usually in the form K-XXXX, NT-XXXXX, NTNUXXXXX).
- The hostname of the computer as used by the operating system.
- What is the absolute path on the computer where the top folder of data will be stored (eg. c:\program files\labsoftware\data\)?
- If the computer is to be protected from the internet/outside of NTNU network, we need to know the internet outlet number that it is connected to (usually in the form 571.364.XXX or T411-XXX)?
Collect this information and send us a request to add the lab computer to the archive system at our email address: orakel@ntnu.no.
How to use it
For most users, the functionality one needs to relate to in the Archive-system is to create an archive task/upload data or view/manage the finished data set. These two are the functionality covered here.
Archiving data
There are two modes offered when using the "Archive computer data". Either "background downloading" or "uploading". The most common is the background downloading, where the user selects which files to download and the copying happens in the background. "Uploading" requires special privileges in the archive system. The most robust solution is to use background downloading and the reason is that it is then possible to leave the lab PC and let someone else work with it and in addition if something goes wrong, it is possible to restart the archiving again remotely as long as the computer is turned on.
Background download
To archive data in the background on a lab computer prepared to use the system, do the following:
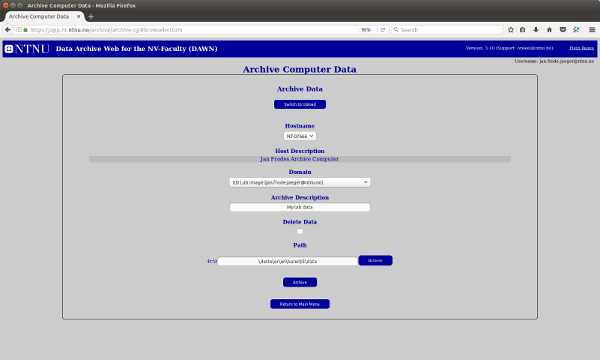
- Go to "Main Menu" and select "Archive computer data".
- Ensure that the right "Hostname" and "Domain Name" are selected. Most users only have one domain and one hostname.
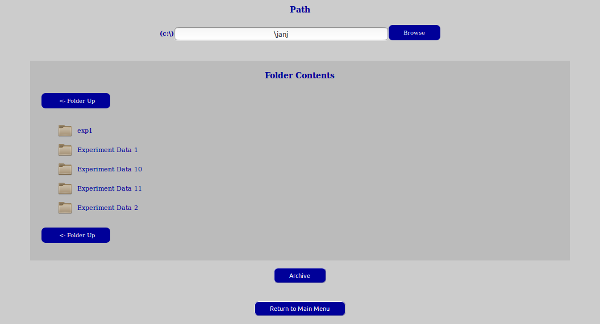
- Write the "Path" to where the data is that you want to archive. Everything from that folder and below is archived. If the path ends in a filename, only the file is archived. You can either write the path manually here or you can do the easiest solution and hit the button called "Browse" and you will get a listing of the files and folders on the lab computer starting at the root data folder. You can then navigate by clicking the desired folder and if you only want to archive a file click the file in question. You will observe that the "Path" input box is populated with the path as you navigate to the place you
 want to archive.
 - Write a suitable "Archive description" so that you know what this data set contains (it will also be searchable).
- Select the choice "Delete" if you wish the archive system to delete the data after it has been archived.
- Hit the archive button.

The archive task has now been created and will be performed in the background. This makes it also possible to use the lab computer by the next user while the copying is being done. The progress of the task can be viewed by going to "Main Menu"->"Manage Data Sets". Here you will see a progress indicator and you can also hit the button called "Log" to see what is happening. The Log-button is particularly useful if the archiving fails for some reason. The status in the "Manage Data Sets" will change to a green "Completed" when the task has successfully copied the data. An email will then also be sent to you notifying you of this.
Upload
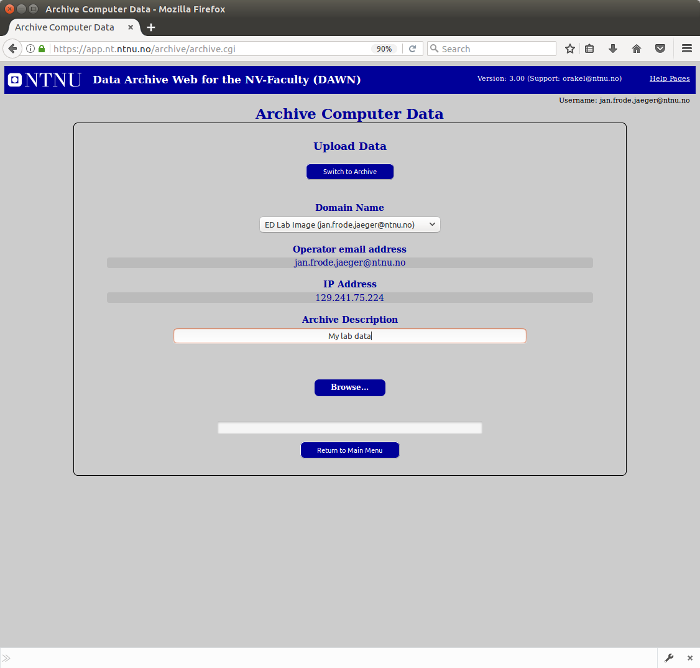
For some users the option to upload data from any computer of your choice will have been granted. To perform an upload do the following:
- Go to "Main Menu" and select "Archive computer data".
- Press the button called "Switch to Upload" if the menu presented is for Archiving.
- Select the appropriate "Domain Name" to store the archive data to.
- Write a suitable "Archive description" so that you know what the data set contains (it will be searchable).

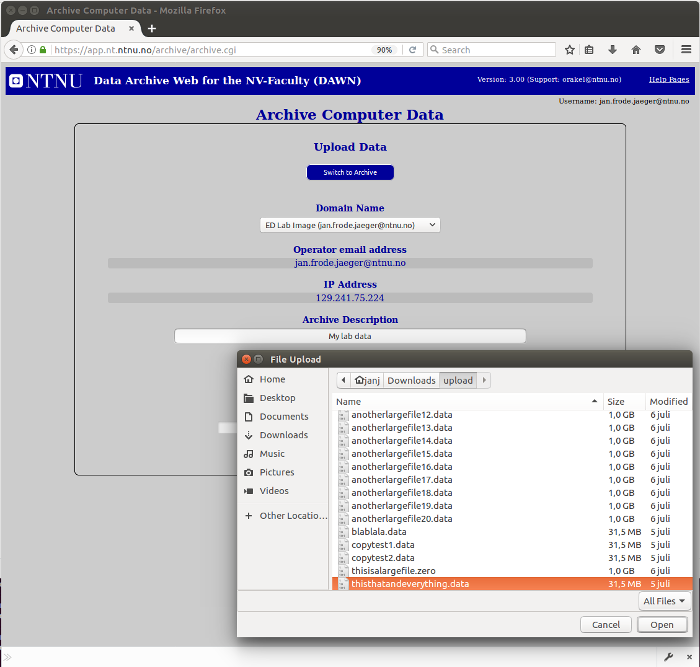
- Press the button called "Browse..." and an upload dialog box should appear.
- Navigate to the files you want to upload. Be aware that you are not allowed to select folders or subfolders. Only files in a specific folder. Because of this your archive data needs to be placed in one folder for an archive set when using upload. This has to do with the HTML specification and subsequently the browser and not the archive system in itself.
- Press the button on the upload dialog box called "Open".

The system then uploads the data and archives it in the system. This might take some time if the data you are archiving is big. However, for most people this is not the case.It will also come a status on the upload in the bar at the bottom of the page displaying the overall progress by filling it with blue color and in addition showing which file is being uploaded in any given instance.
Change password
Each user has the ability to change his or her password by themselves. Do the following:
- Go to "Main Menu".
- Press button called "Manage Users".
- Press button called "Change User".
- Select your own user from the drop down menu and press "Edit".
- Write your new password and press the button "Change".
This should be followed by a successful message.
It is also possible for users with an NTNU account (typically employees and students) to login with FEIDE authentication and then change the password used for manual/non-FEIDE login.After they have logged in with FEIDE they can use the same steps as outlined above. Please note that the password saved by the archive system and the password used by FEIDE are not the same. You can choose to set them to the same value, but they are saved in two different places.
The password-/authentication mechanism in the archive system is two-fold:
- The password registered by the archive system itself and which is connected with the email address registered by it (this makes it possible for non-NTNU users/email addresses to login without having the benefit of FEIDE authentication).
- The password set for your NTNU-account and which is not stored by the archive system. This password is used when authenticating with FEIDE. The archive system trusts FEIDE to authenticate for it and it only receives relevant data from a successful login of a user. The FEIDE credentials and the archive account registered in the archive system is connected by the FEIDE username with domain (eg. alice.liddell@ntnu.no) or the shared email address (alice.liddell@ntnu.no) - in that order. If no match is found on these two, then the archive system creates a new account based on the FEIDE information.
This disinction means that if you are in a lab where FEIDE authentication is not possible (due to the fact that the lab computer is on a restricted network not being able to see the necessary FEIDE resources), you have to use the email and password registered in the archive system. You can still use the FEIDE authentication as soon as you are back to your own computer with a normal network access in order to view the archived data sets.
How to access data
When an archive set has been stored by the archive system, it can be reached in several ways. These are:
WEB-interface - Link
To access data this way do the following:
- Login to the web interface at https://app.nt.ntnu.no/archive/.
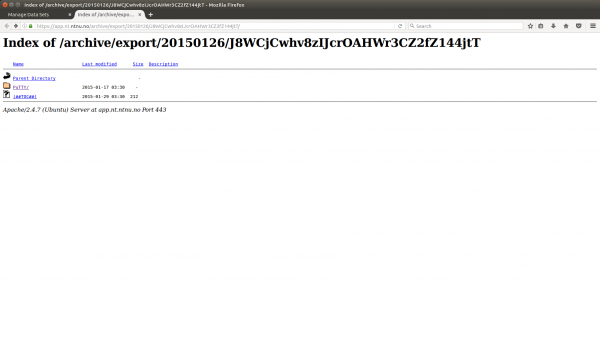
- Go to "Main Menu"->"Manage Data Sets" and hit the button called "Link" on the data set you want to download files from. A separate tab will open with the ability to browse and download the data set.

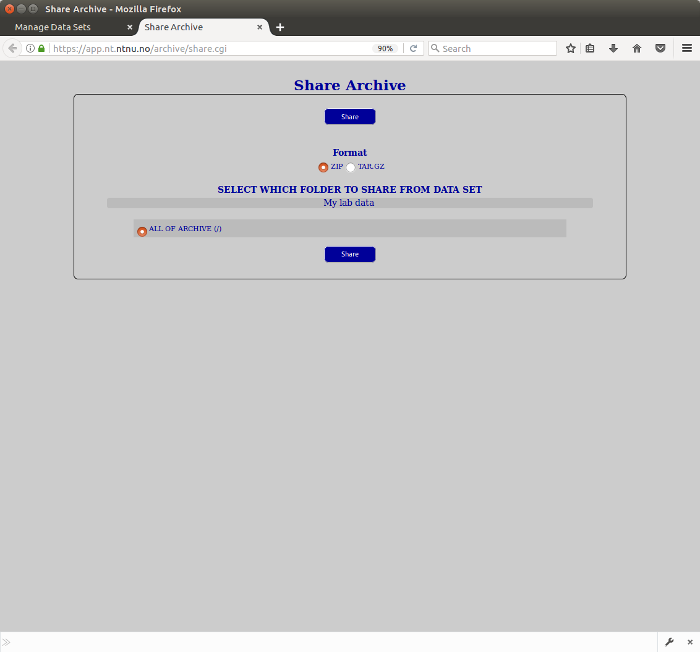
WEB-interface - ZIP/tar
To access data this way do the following:
- Login to the web interface at https://app.nt.ntnu.no/archive/.
- Go to "Main Menu"->"Manage Data Sets".
- Press the "Share"-button on the data set you want to zip/tar data from.
- A separate tab comes up with the ability to see all the folders in the data set. Select if you want to zip or tar and select which folder (including sub-folders) you want to zip/tar.

- Hit the button "Share".

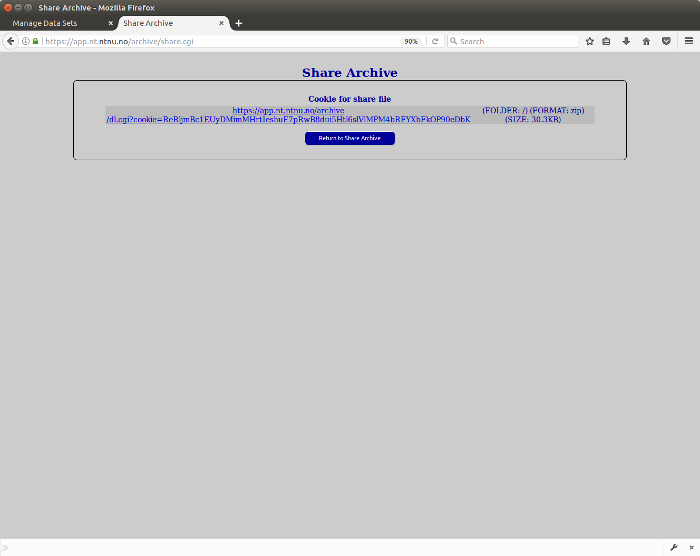
The folders chosen will be zipped or tar'ed and then a link created where you and any other who has it can access the data. The link will live up to one week after someone accessed it the last time (access makes it live by one week from last access).
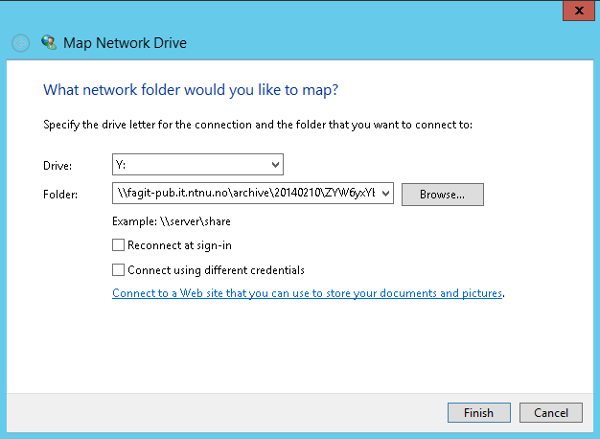
SAMBA/CIFS without username and password
Allows for mounting one, specific data set as a share folder. It is not as flexible as mounting with a NTNU username and password (see below).Please be aware that in Windows 10 there might be policies in effect that prevents you from mounting shares without password and that you should then instead resort to using the authenticated method as outlined below. The authenticated method will only be available for users with a NTNU account.
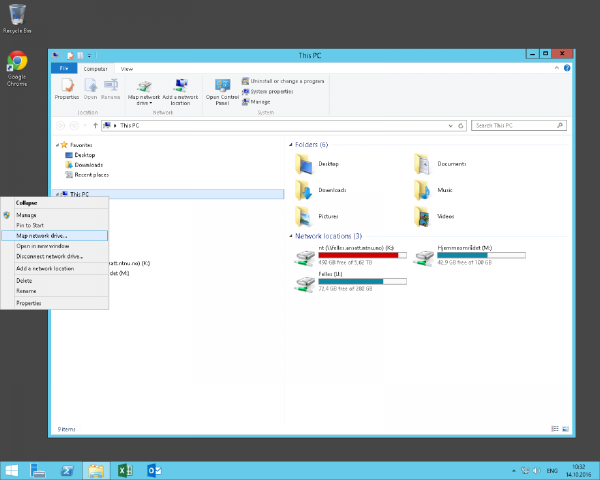
This can be performed on many operating systems, but in the most used, Windows, it is done so:
- Open Windows Explorer (alternately hit Windows Key+E).
- In Windows Explorer press right button on the mouse over "This PC".
- From the drop-down menu, select "Map Network Drive".

- In the "Map Network Drive" dialog box, select which drive you want to mount the samba share on (it is not so important, so really up to you), then write the folder name to mount, which is "
fagit-pub.nt.itnu.no\archive\DATE\RANDOM_CHARACTERS" (DATE and RANDOM_CHARACTERS needs to be replaced with the right values for your archive set). Now, the complete samba URL can be fetched from the archive system by going to "Main Menu"->"Manage Data Sets"->"SMB URLs". Use copy/paste from the text that appear.
- Press "Finish".
A samba share of your data set should now have been mounted on the computer.
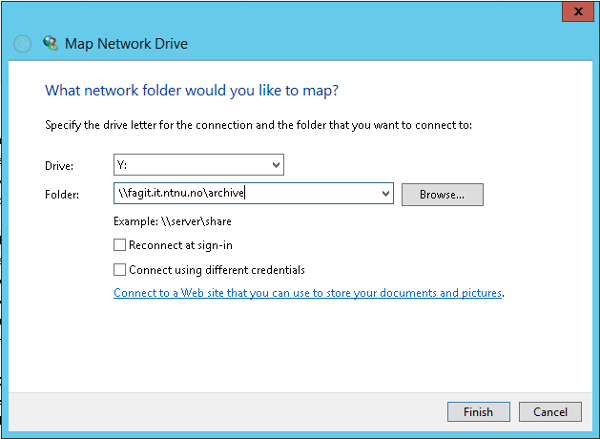
SAMBA/CIFS with NTNU authentication
This allows the mounting of a SAMBA/CIFS share on the users computer that contains all the data sets that the user has created (and obviously not deleted). There will be two folder here at the top called "computers" and "domains" and for users that have archived data in the background the right folder is the "computers" folder. The "domains"-folder is for users that have uploaded data into the archive system.
In Windows do the following:
- Open Windows Explorer (alternately hit Windows Key+E).
- In Windows Explorer press right button on the mouse over "This PC".
- From the drop-down menu, select "Map Network Drive".

- In the "Map Network Drive" dialog box, select which drive you want to mount the samba share on (it is not so important, so really up to you), then write the folder name to mount, which is "fagit.it.ntnu.no\archive".
- You can tick the choice "Reconnect at logon" if you so choose.

- Press "Finish".
You should now have a samba share mounted with your archive data sets.
Things to remember about mounting samba/CIFS with NTNU authentication:
- You have to be on a NTNU network or through VPN.
- You have to be a NTNU employee or student (basically have a NTNU user account).
- You have to have been logged into the archive system at least once by authenticating through FEIDE/Innsida. There is a separate button on the archive systems main web page for this. The reason is that the system needs to know your NTNU username so that our samba server knows your permissions and under which username to share out your archive sets as.
- It takes up to 15 minutes after you have finished archiving data or authenticated through FEIDE/Innsida for the first time before the data is visible on the samba/CIFS share.
Contact
- Oracle Support Services can help you if you have questions or problems.